I am using a Labratory Flask for my “Jar” its quite a big one perhaps 6 or 8 inches in Diameter
maybe less, estimating aint my strong point (perhaps about 600 to 1000 ml flask)
My question is, would a much smaller flask enable it to be more responsive
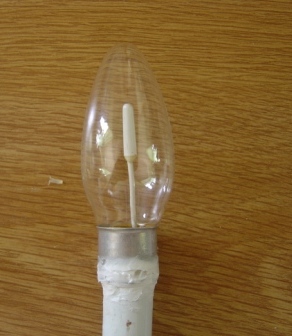
I have made a new solar sensor out of a light bulb of all things and from what i can see
from the graphs at the minute, the difference is astounding
Ok so its now overcast/ mostly cloudy since adding it to the mast but you can see from the
graph below the difference from the lab flask this morning.
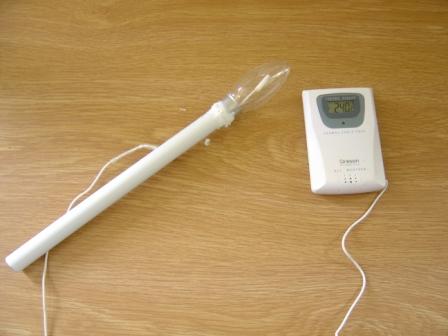
I have also attached some images of the new solar sensor, it was very straight forward and i
have not included any black at all this time, this way i am hoping it will get hot and cool down
a lot quicker than it would with any of it being black, perhaps not the warm up part but certainly
the cool down part as its not retaining the heat, hopefully, but if the graph is anything to go by
then, its made some difference for sure
I just need to setup the solar sensor in WD now but i need to wait for a clear dinner time, i have
it somewhere close, but it needs more tweaking…
As for the creation, that was simple to do but the hardest part was removing the bottom section
that plugs into the socket, I had to use a hammer drill cause it was some sort of glass where the
terminals were, After i managed to remove the black glass from the fitting end i drilled into the
workings and removed them, from there i found a bit of white tube and where the 2 prongs were
for the bayonet fitting i made the 2 holes a little bigger and also drilled the same on the tube, that
then gave me a way to fix the bulb to the tube with a nut and bolt straight through
I then drill another hold on the tube further down so i could thread the temp probe up the tube and
into the bulb, I then used a bit of rubber inside the bulb (in the metal part) to hold the temp probe in
the center (it worked ok), then it was just a case of attaching it to the tube with the long nut and bolt
then sealed it up with silicone and attached another tube the slid tightly on to the sensor tube and that
slid nicely in to the top of the mast, i then just taped it up with duck tape and job done
Hi Simon,
Sounds a great project that, and looking at the graph it looks like you are getting a good responce from when the clouds pass over, I reckon that would control the Icons better.
This has always been my niggle in as much as, you get a 100% solar on the yellow strip on WD, you get the full sunshine Icon showing yet it is raining, its only when the rain Icon comes up that it changes.
I have had a good shower before and showing 100% and the sun Icon up all because the temperature is high.
Will have to experiment with your idea see how I get on, thanks for sharing it.
I know that I saw a vast difference when going from a standard temp/hum extra sensor in a 200g coffee jar to a ‘probe on a lead’ in a small narrow oilve jar - but in that case a big part of the improvement would have been the move to a lower thermal mass sensor.
I like your idea of a light bulb - nice thin glass, so it should loose the heat fast when the sun pops in.
And less wind resistance right at the top of your mast…
You need the Rain Duration sensor, as soon as it as it starts to rain, i mean the few seconds
it starts my icon changes to rain, the RD sensor is brilliant for changing the icon, the heater in
the RD sensor is on the ball as well, as soon as it stops raining the heater has dried it and removed
the rain icon…
Hi David
That flask i was using had a lot of wind resistance, you could see the mast giving it large wobbles lol
now its minimal and thats with a 4 bft gusting at 22mph
Dont start me off again, took me about an hour to sort the guy lines out pmsl…
I think the candle bulb im using is prob twice the size of a small test tube, i think its
about 1 and a 1/2 inches in diameter, and the glass is quite thin, i think a test tube
glass will be much the same as the lab flask i have and thats quite a thick glass
There is one thing i have noticed with the smaller area and thats the offset used for
the solar settings. before it was about 13.5 and now its as low as 2.8 and the recommended
starting setting is 7.1 so its quite low now , but then i do need to wait for a nice day so that
might go up some yet…
I am very pleased with the results thus far though
I thought it was a bigger bulb, I agree, there probably wouldn’t be much difference. Although it’s a good question whether it’s the air volume, or the glass that is the bigger factor.
mmm, that is a very good question, i dare say a factor of both, its a case of which is the higher factor
Also i feel there needs to be a happy medium as well, if too big it will retain the heat longer but warm up fairly quick,
if too small it will take longer to heat up but quicker to cool down, i could be wrong on some of those points mind
i am just guessing with what little logic i posses lol
Its hard to tell which factors i have removed has made the biggest difference, what i mean is,
on the old one it had a much bigger area, much thicker glass and a matt black tube with steel inside
(was to help dissipate the heat quicker, dont think it worked though lol), I dare say all of the above
but by how much and in what order of effectiveness, the only way to find out is to experiment, i
would need to get another temp probe though…
I got a feeling the black tube would have most certainly played a big part in it, it was a plastic tube as well
so this would retain heat much longer than if it was say steel…
As soon as i find another cheap probe i will have a play i think…
I feel the vacuum side of it might be a tad difficult, is that a specialist job?
I think ya might be right about the probe end though, perhaps the next maintenance schedule
i will sort that out and see what happens, or hopefully i can get hold of another probe 1st to test?
actually, wouldnt a light bulb already be in a vacuum well, it prob was until i hacked it to pieces lol
If so it should withstand some pressure but attaching it to the hoover wont cut the mustard me thinks lol
If i was totally serious about having ago at something i suppose i could go and see a neon sign maker,
They would be able to make the tube to your specs and create the vacuum, but i dont think its worth
the expense just for a modified sensor, it would prob cost the price of a low priced Davis lol
But, i will do some experimenting though as soon as i get another probe, I have a couple of ideas, just
not sure if there viable yet
I would try and paint the probe.
Try doing another experiment, you may be surprised
if you want to create a vacuum, silicone the base of the lamp light bulb
with a good thickness when the silicone is dry , used a syringe stick the needle through the silicon
and draw out the air ,
Yes your right, it is Argon gas, i remember now from whatching it on the Discovery channels lol
Hi Mick
Yeah it certainly appears to be an improvement, i am thinking it might be too good
cause when the sun goes in it drops to 0, is it mean to do that?
I will certainly try the blacking of the probe and the vacuum, but i need to get hold
of another probe 1st so i can experiment with that one opposed to pulling the mast
down all the time
The problem will be sealing the wire entry, even if you get a good seal to the outside sheath of the wire it will still suck air in through the core. You would have to put some lengths of non stranded bare wire through the silicone, cut the sensor cable and solder the sensor wires to the solid wires to pass through the seal.
Do you have a vacuum pump for dent pulling? Otherwise one of those small, plastic, hand operated, vacuum pumps they sell for brake bleeding would work.