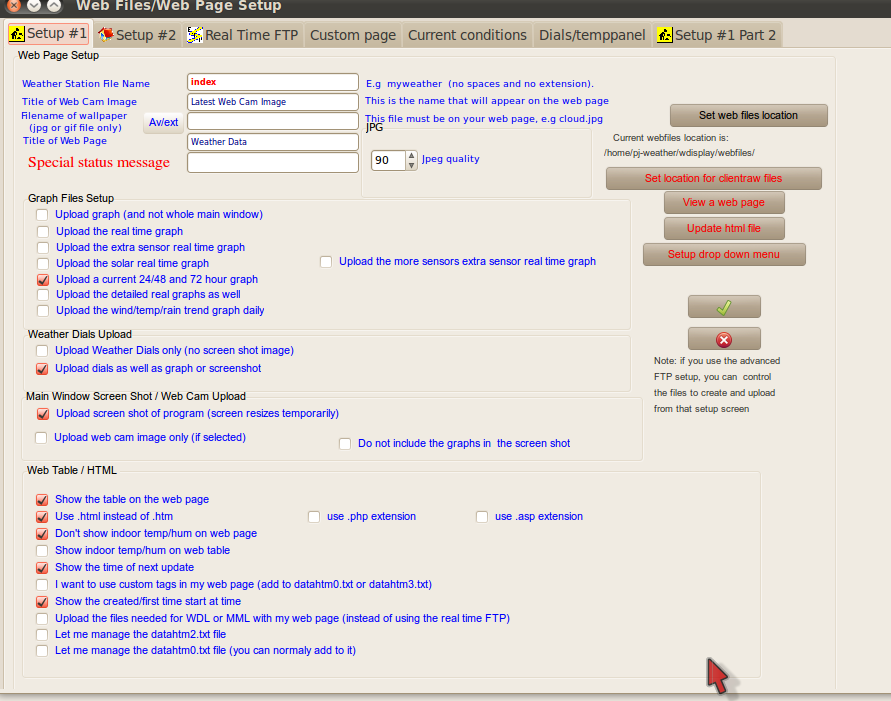
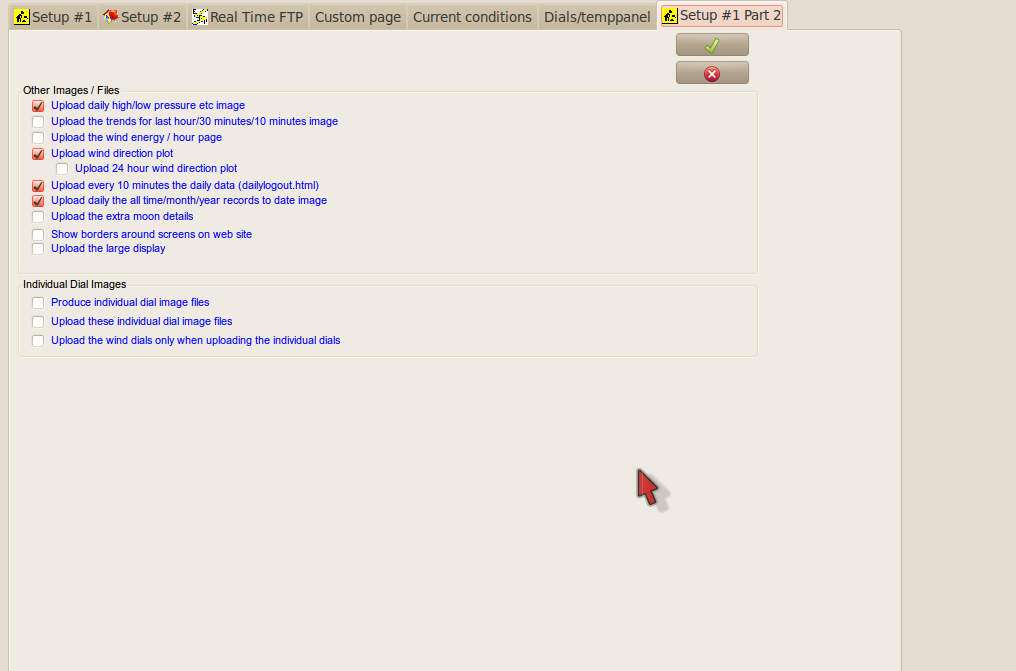
Here are 2 of the 3 set up pages (max upload for all attachments is <200k…so, sorry will have to attach the third on to the next post). Note the first page of your website must be called index in e-rice. WD produces a file called index if you call your website index as in the attached screenshot. If your first page is not called index, then your information will not load.

Next we will tackle the webcam.
Niko says in one of the posts that setting up the WD component of the website i.e. the data was straightforward, my experience is that, yes in hindsight it is …but it was far from obvious and straightforward at the time…and I think that had to do with lack of documentation and leads…hopefully this tutorial will go some small way to remedying that.
My biggest problems were a) working out that you needed a static file name that WD and WU could link to b) finding a way of creating a static file name c) having a tick in the wrong place in one of the innumerable boxes on the webcam form stopping my jpg from loading.
Setting up the camera, for me, came in two parts.
-
setting it up to connect to my website
-
setting it up to connect to Weather Underground.
Regarding 2, here is a post from jloflin
OK, I’m going to try to piece this together. It took me many months of fiddling with settings. First, are you capturing images to your /wdisplay/downloads/ directory? That was my first problem, figuring out how to get my webcam to send images to that directory every minute. Then I made sure the images were named “snapshot.jpg”
Next, I opened control panel. Under “Web Site Configurations” I opened Web Cam. I clicked on “Load/Set Webcam Image File” and went to the /wdisplay/downloads/ directory and chose “snapshot.jpg”. Then I closed the Web Cam panel, using the check button.
Then I opened FTP & Connections. Under the Webcam tab, I clicked the “choose webcam file” button and navigated to and chose the “snapshot.jpg” file. Then I clicked the add button. I then closed the FTP & Connections panel, using the check button.
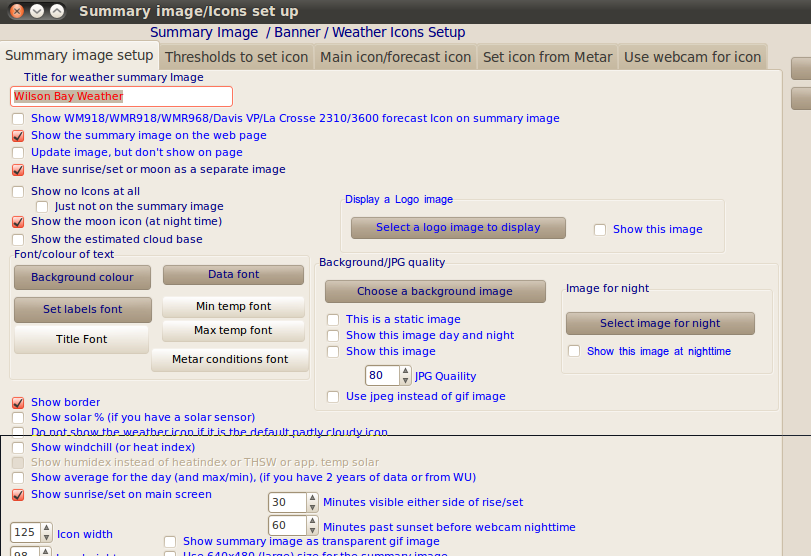
Next, under the “Station Settings” heading, I clicked on “Summary Images & Icons”. Under the “Use Webcam for Icon” I checked “Use the Webcam Image as the Icon”, “Show on Main” and “Stretch to Fit”. In the “Select Webcam Image to Use”, I clicked on the “Select Webcam Image to Use” button, navigated to “snapshot.jpg” and selected it. Then I clicked the “Use this Filename” button. I then closed the window with the check button.
Viola, within about 5 minutes, I had my webcam image as the icon on my main page.
I hope this helps. If you need, I can try to send you some screenshots of the windows and tabs I used. The only Webpage I’m uploading to at present is Weather underground page for my station at zip code 79912. I’m almost afraid to begin the effort to upload to a personal web page.
…
The snapshot.jpg is downloaded to my computer by the webcam’s control program (I use a panasonic camera and its embedded control software). It downloads once per minute, replacing the old file with a new one. One of the options in the control software is to just replace the file, and not to number them. Wdisplay just takes the file that it finds.
I’m uploading to Weather Underground the same snapshot.jpg that Wdisplay is using, but at 5 minute intervals. I chose the ftp method, and complete all the information requested on Weather Underground. It then gave me a camera name. In Wdisplay, under “Control Panel”, click on the Weather Underground icon. On the Weather Underground panel, click on the button to set up webcam uploads. In the FTP settings, the username is the name of your camera on weather underground, not your login name. Mine is randyloflinCAM2. The password is the same as your login password. The image file is the same one you use on your main page, mine is /wdisplay/downloads/snapshot.jpg. Select your upload times, turn the red button green and check the save button, close control panel with the save button, and you should be good to go. Now when I look in /wdisplay/downloads/, there is a wunderground.jpg file, which I presume is the one wdisplay is FTP’ing to weather underground.
- Go Control Panel > Web Cam
- concentrate on page 1 web cam set up…ignore all other pages…all you need worry about is your static file name and location. Don’t waste time on time stamping etc.
- see attached for how my set up looks. I had to crop it as the file was too big to upload…but I think you get the message. If you are linked correctly to your static file (set the webcam file image), the picture should show here. My static file image is called image-1.jpg.

Next you have to go to the FTP & Connections (that is what it is called on the Control Panel) thought the title of the window is FTP/Internet set up. This is the kind of thing that drives me crazy…lack of internal consistency…and different parts in different places…something this bitty needs some kind of trail…otherwise, newbies spend inordinate amounts of time trying to piece things together…and often just give up in frustration.
Here is my WebCam/FTP set up. I had accidentally ticked the box “use this remote directory instead” and spend days of frustration wondering why my jpg would not upload.

My experience with trying to get the jpg to upload to WU was equally frustrating via FTP. There are two options for loading a webcam image on to WU (and WU in the webcam area is far from a paragon of virtue when it comes to simplicity of instructions) one via FTP and one via your website URL …where they scrape the jpg from your website. I tried the FTP, could never get it to work (but see above) and then tried the URL and got that to work. Finding our where the kept the image after they uploaded them on to WU was another saga. You have to go to the camera set up page and click on the name of your webcam…sheeesh!
OK, so now we were able to upload a static image (and at this stage it was very static) to the website and to WU. The next problem was how to get an image every hour from my webcam and get that to remain named image-1.jpg. The only serious webcam software I could find on Ubuntu was guvcview. This was capable of taking images at set intervals; however, each time it took an image it incrmented the file name by 1. So I had image-2.jpg…image-19.jpg etc. At this stage I was mostly using the command line to get the image.
$ guvcview -i /home/pj-weather/Pictures/Webcam/image-1.jpg -m 1 -c 20
and this worked OK…but it meant that the program video was open the whole time, hogging resources etc.
I decided the most elegant way (hi niko! - blush) was to set up some kind of a cron file which would delete the old image-1.jpg and renmae image-x.jpg as the new image-1.jpg. I tried crontab and that did not realy work for me…the problem, and this took some time to solve was to do with where guvcview was outputting the video - see later.
To cut a long story short, I got a lot of help from the developer(Paulo Assis - thanks Paulo) of guvcview and from others on the Ubuntu forums.
I set up a script in /etc/cron.hourly…this will run any scripts in the folder automatically every hour.
Here is my script (apologies for the inelegance ![]() )
)
#!/bin/sh
#This is a script which will a) detlete all incidences of image*.* from the webcam file
# and will then start guvcview and get it to take a single photo.
#

PATH=/opt/someApp/bin:/usr/local/sbin:/usr/local/bin:/usr/sbin:/usr/bin:/sbin:/bin

export DISPLAY=:0


rm /home/pj-weather/Pictures/Webcam/image-1.jpg


guvcview -i /home/pj-weather/Pictures/Webcam/image-1.jpg -m 1 -c 20 --exit_on_close


mv /home/pj-weather/Pictures/Webcam/image* /home/pj-weather/Pictures/Webcam/image-1.jpg


exit 0
Here are a number of posts from Paulo
Hi,
Since every time you change the filename the file counter resets, your best option at the moment is to have guvcview run twice and capture two different files.
e.g. add the following to a script that runs every hour:
guvcview - i /xxx/xxx/xxx/image.jpg -m 1 -c 20 --exit_on_close --no_display
guvcview -i /xxx/xxx/xxx/image2.jpg -m 1 -c 20 --exit_on_close --no_display
this should always create the same two files:
image-1.jpg and image2-1.jpg
Regards,
Paulo
Hi,
create a file name image_capture.sh and add the following content:
#!/bin/bash
TIME=$(date ‘+%H%M%S’)
guvcview -i image_$TIME.jpg -m 1 -c 20 --exit_on_close --no_display
mv image_$TIME-1.jpg image.jpg
Then set this script executable:
chmod +x image_capture.sh
you should then be able to add it to the cron tab and run it in a hour basis.
Since the filename will change every time the script runs the file counter will always reset.
Regards,
Paulo
Hi, For Ubuntu 11.04 you can download version 1.5.0 binary deb
directly, or add my ppa to you repository list:
deb:
http://prdownload.berlios.de/guvcview/guvcview_1.5.0_i386.deb
ppa:
sudo add-apt-repository ppa:pj-assis/ppa
sudo apt-get update
sudo apt-get install guvcview
as for the display you need to allow other users (like root) to export
their displays, for this you just need to run “xhost +local:” as your
current user or for a more permanent solution, create a script named
for instance xauthority.sh in /etc/profile.d with the following
content:
#!/bin/bash
Allow local users access to default display unless it’s owned by root
if [ ! “id -u” = “0” ]; then
export XAUTHORITY=/home/$LOGNAME/.Xauthority
export DISPLAY=:0.0
fi
I’ve tried this and it is working fine from the cron tab (just add the
“export DISPLAY=:0” line on the script), the file image is created as
root with read permissions for all.
Regards,
Paulo
Bahh! the xauthority script is wrong, this is the correct one:
#!/bin/bash
Allow local users access to default display unless it’s owned by root
if [ ! “id -u” = “0” ]; then
xhost +local:
export DISPLAY=:0.0
fi
Sorry,
Regards,
Paulo
My website and WU site now work the way I want.
I was hoping to go on to use some of the more elegant templates on my website (the WD is all very wll…but elegant it is not!), but getting this far has taken so much time that I think will until somebody else writes a “how to”
Done! Thanks.
Anybody know how to set up a visit counter on the website?
if using the default web page, add the needed html code to the datahtm3.txt file
if using a custom web page, then added the needed html code (to display the hit counter) towards the end of the html code that is the template file
Thanks for that, Brian…done!
Good job there dunbrokin, and thanks to Paulo too ![]()
Its very easy bro, if you just steal most of the stuff from other people ![]()
Something very weird has happened to my FTP upload to my website www.wilsonbayweather.com. It stopped dead at midnight on Saturday (coincidently [or maybe not] with the change to summer time in NZ)…no matter how I try, I cannot seem to get it to restart…can anybody help me out here please.
According to the log, the information is uploading…but it is not appearing on the website!!
Problem solved…for some reason my FTP settings were lost at midnight when the the time changed. In resetting them, I forgot to upload on the FTP site to /web. I changed this, and things are nearly back to normal. I still have no idea why my FTP settings were lost.
This happened to me again on Sept 3 2013…there must be some random bug somewhere in the software.
where do you live? (re day light saving time)
Otago ![]()
I wondered if was in NZ…
but daylight saving has not started yet…3 weeks time it does though…
![]()
It has happened in total about 3 times since I made this post. Once seemed to cooincide with the time change, one just righted itself after a few days…I was abroad and was watching the website…it took about 3 days, and one was last week…and this last time I lost the config file data and had to reconstruct from scratch. I waited a few days to see if it would right itself (as I had assumed it was a website reset problem)…so, sorry, no real pattern that I can tie it down to.