I have had one working for over a year now and gives good relative sky conditions at nighttime like an Airport Metar would, if you knew how to read one…
The trouble was the quality of the Polyethylene kitchenware plastic container meant that there was no UV protection and after a few months showed signs of cracking up. Inside it, I had a black painted paint tin lid on top side and white underneath, pushed to the top of the inside of the container and this had a 1-Wire temp sensor glued on the top black surface and wires fed back to a solar board to the side connectors and then listed in WD as an extra temp sensor then that Extra Temp sensor No was claimed as the cloud sensor under Setup, Miscellaneous settings.
Well this Tupperware like container cracked up and water got in, - which cancelled my Hobby-Board network - I pushed another plastic container over the top to temporarily maintain the weather protection. Then we had a storm recently and the extra container blew off, most of the cracked body of the original container died further and went off into the distance with the winds, some polystyrene packing disappeared and then the paint tin lid was found on the back lawn and all I could see from the ground looking up was the lid screwed down still and the wires with the temp sensor partly attached - one leg was broken off the sensor when the paint tin lid left the scene rapidly so it is definitely not working.
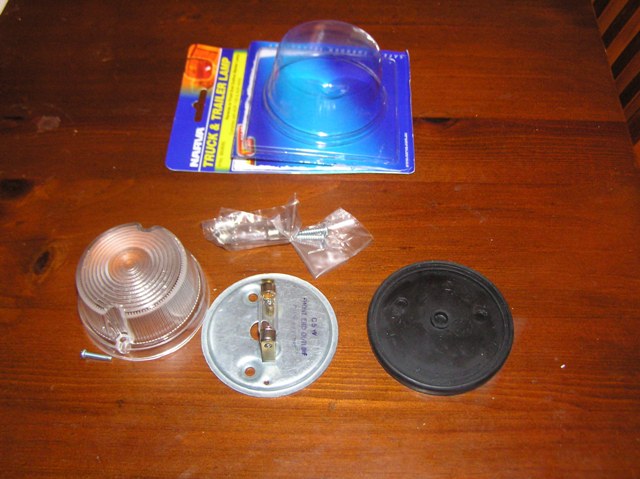
I had a recent thought, and am now basing my latest project on this idea, using a car reversing lamp or front facing white light - caravans here have them as do long trailers etc forward facing. Inside is a metal base plate and then a rubber base washer to seal against bodywork. It looks ideal and I will follow through with some photos and design sketch of how to complete this simple project. I will link back to a previous effort I posted on here as well. I miss my accurate sky conditions at night
I used a lab beaker bought off tradme, cut a thin aluminium disk the same dia, painted black and temp sensor affixed. Then cut a plug of polstyrene and glued the ali to the top. Inserted same into the beaker with the wire inset into the poly and glued a disc of galv steel to the bottom of the poly.
The bottom disc has a 6mm stud in the centre as a mounting device and then siliconed the bottom disk to the beaker. Been going now for nearly three years and no problems.
The lab beaker is made from a glass which has more clarity than standard glass and will withstand extreme heat. I have had readings of over 70 C during the summer. This works for both night and day sensor.
For the last 6 months or so I’ve been using a piece of 100mm drain pipe about 125mm deep. Inside are 2 “discs” of 50mm thick polystyrene. In the top disc I made a circular recess (rebate?) about 5mm deep. In the bottom of that rebate is a black painted alu foil disk with an OS “temp only” sensor (also blackened) just poking through the centre (its wire is fed through holes through the polystyrene). Over the top is a piece of clear plastic from a CD case siliconed in place (I was going to use glass, but it the bit of CD case fit so well, and it not shown any sign of degredation yet[1]). To help keep things dry I popped a couple of sachets of silica gel between the 2 layers of polystyrene, and then I siliconed between the edge of the bottom layer of the polystyrene and the pipe wall, and around the hole the sensor wire goes through. Around the outside of the pipe I wrapped alu foil tape.
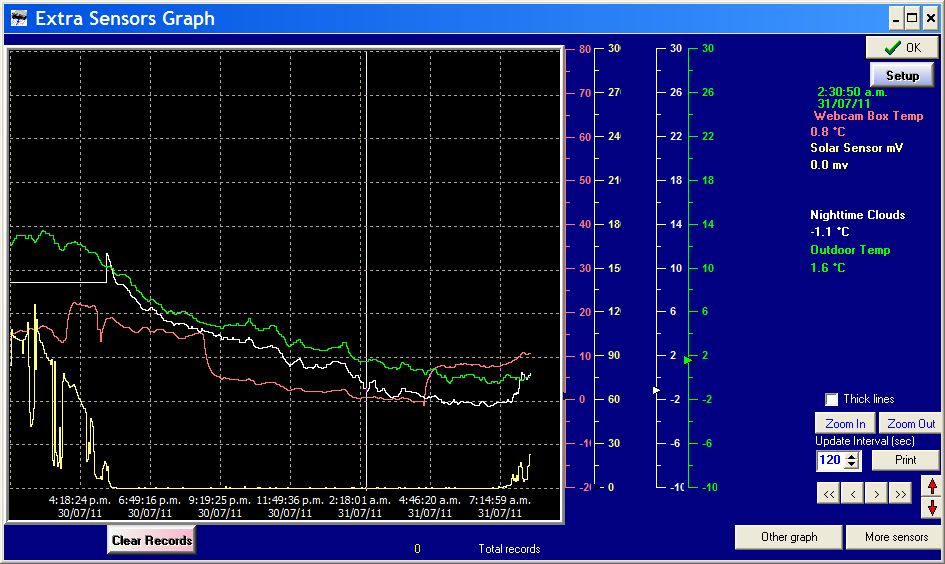
This arrangement gives a clear night difference of -3.7
I made it Saturday afternoon, painted and glued and soldered, then placed in same position as the old one. The result was not as good as the previous one put down to the different IR transmission properties of ABS vs Polyethylene - the soft kitchenware product I used last time.
Perhaps the lamp bezel is polypropylene, I don’t know but it was only a -2.7
Yes more likely acrylic or polycarbonate, agreed. Overall, I guess it is thicker and has “ring” profiles inside to help distribute the light so if lower performance for IR transmission and thicker, then there will be less temperature differential, ie less sensitive as a device. But the main criteria this time were a) Long Life and b) Easier to install - more purpose built and less work… And hopefully more folks can follow this simpler but more effective long term design.
WD does a great job of doing the Math and setting the weather condition ranges based on the temp differences, so that is what makes it work, despite a lower range in performance.
Project photos to come later today. Lunchtime now…
Well I have posted my project on Flikr where it may be easier to view with descriptions for each photo, but I will link the photos into here so they are embedded in the text.
Note - this whole project just took a Sunday afternoon.
All photos are in a Set here on Flikr website also there are larger views of each with more descriptive text as well. And some more photos not shared here…
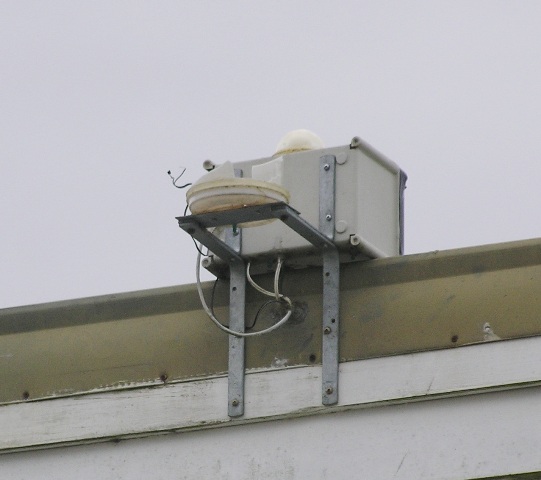
The old nighttime cloud sensor died of UV damage on the soft PE Kitchenware plastic, and then a storm blew it to pieces, with parts distributed onto the ground, and the temp sensor destroyed with a solder leg broken off when the metal plate the sensor was glued to, blew away. So I needed something that was UV resistant and designed to be out in the weather. Hence the selection of an auto spares NARVA reversing lamp.
Because the plastic is a reasonable insulator with low conductivity, and there is no air to air connection - the plate inside is not connected to ambient air via conduction or convection. I noted that during daytime with heavy cloud the temperatures did come close together within 0.1
Underneath the plate is a thick rubber washer/gasket and that adds another level of insulation. However, there will be a thermal conductivity transfer through the mounting bolts to the steel bracket underneath. I should find slightly longer ones and use fiber washers for some insulation as well. However, the design does have a slight drawback in that there is a parcel of air above the plate that will dampen down the sensitivity but so far that does not appear to be the case. It does seem fairly sensitive and follows conditions pretty faithfully.
So apart from the smaller “delta T” I am getting, I am pleased as it was an easy installation and the materials were common and readily available.
I think you would have a much better delta T if you had a separate plate in the “jar” with insulation between it and the base plate. As it is now I don’t see that there is much jar effect at all but that’s just my opinion
The solar sensor was a pingpong ball in a jar to start with - the normal solar sensor from Hobby-Boards, then it was converted to a webcam weather dome enclosure.
It is essential to use a similar board as the solar sensor, a humidity, or a temperature board would do as they all have the side connections for additional temperature sensors. I had the solar sensor already and added the “nighttime cloud sensor” into the same board to get it into my 1-Wire network.
They both provide sky conditions so it is likely people want to do both as I have done. Others with some Davis or OS stations etc, can have additional external sensors too from the manufacturer, but La Crosse don’t so I had to use the Hobby-Boards route.
with the night time sensor, the black body needs to be sheilded from the ground...thats one thing that is important
And as I described above, this does have a rubber mounting washer that acts as a weather seal and a thermal barrier from objects from below. I also painted the bottom of the plate white, and could have used a silver paint instead.
Hi guys, I thought I would share my success with my cloud sensor. Instead of using super glue, I used some thermal epoxy I had left over from other projects.