Hard to be sure from info in the link he posted, but I doubt Bashy’s solar panel would be powerful enough to drive that.
Sadly thats all the info i can give, I did have a tiny solar panel from Maplin before and that ran a fan ok
that was prob about 1/4 or a 1/3 of the size of the one i have in mind, bit as it wasnt really for outdoor
it didnt last too long and ended up going to mains wired and that lasted a few years for sure ![]()
I spose there is only one way to find out, shame its raining now #-o
Going to buy the component parts for my monstrosity today
The good part about solar is, it will cut in only when its needed, the downside is, there are days during
summer where you can feel the heat of the sun through the clouds, just hoping the fan will be fast enough
on less solar, OH WAIT… my solar spot lights are rechargeable, so if i just disconnect the spot lights and
keep the solar and battery unit, then the fan will work when no or little sun…
Oh well, need to get me a fan yet and the rest of it lol ![]()
It’s a start…
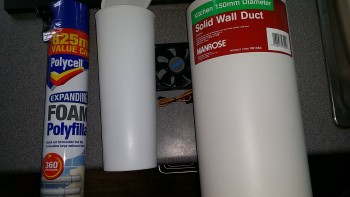
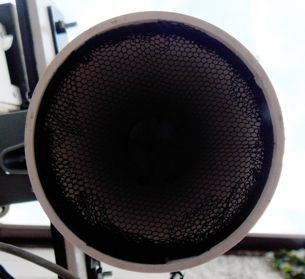
OK, i have started this wee project now, I bought a bit of ducting for an extractor fan for the outer shield, was expensive
for what it is but i thought it would save on paint etc as its very heavy duty and should withstand the elements etc.
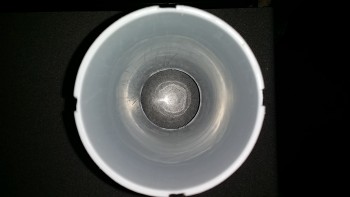
The inner is the same idea as Mick, the bog brush holder
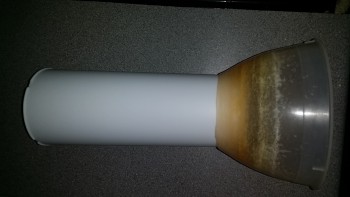
I wanted to the bottom (intake) to be funnel shaped but i could not find a funnel today, tried hard too ![]() so, i opted to
so, i opted to
use one of my food bowls, baked bean stains an all :lol:
I cut a hole into the bottom of the bowl big enough so that the brush holder fits in snuggly, i mean a little tight but not
too tight that ya cant remove it…
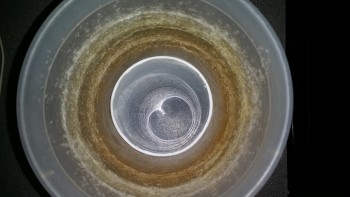
I thin cut a hole in to the bottom of the brush holder, now, why i didnt cut off the bottom opposed to cutting a hole i will
never know, it was really hard to so go figure #-o :oops: either way, it ended up how i wanted it.
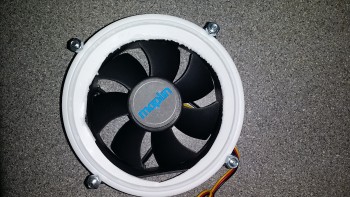
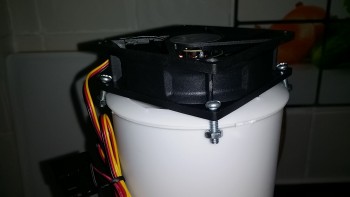
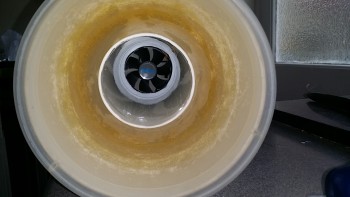
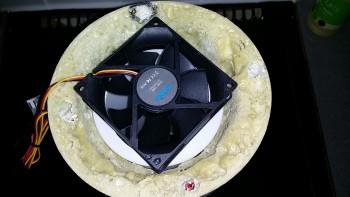
Next was to figure out how to attached the fan, as it turned out, it all fell in to place and i couldn’t have asked for better…
I cut a hole into the bog brush holder lid, big enough for the fan to blades, i then used 4 nuts and bolts and attached it
to the lid, you can see how i managed that without drilling in the image, i was then hoping that with the nuts in place it
would snuggly attach to the holder but sadly it didnt, i had a brainwave, i cut off 4 notches where the nuts sit and with
doing this i can now push on the lid with fan and i can turn it so it locks in place, no need for glue or screws, that part
worked out brill, may not have done with a different type of bog brush mind… see images
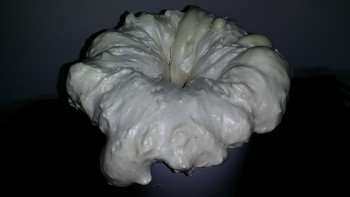
Ok, with the fan figured out, all that was needed was to (amongst other bits) was to fill with foam…
… yeah, that was fun… lol :roll:
1st of i removed the fan/lid and also took out the inner and coated the outside of the inner with WD40, why? you
ask, well, i am, hopefully, making it all so its easy to take it all apart if needs be, the idea is for the inner to be able
to slide back out and in turn leaving the insulation (foam) attached to the inside of the outer shell, in theory anyway
will know tomorrow, although, the inner does turn leaving the insulation in place but it aint properly set yet to to be
able to remove it, but boy, it was interesting filling with the foam, i have used the stuff many times before and i have
never learnt, it looked like it was taking quite a lot to fill the gap, evidently that was not the case… i ended up with
a carrier bag full of excess foam in the sink :roll: :oops: #-o 8O :lol: :lol:

Ok, so this is how far i have got and now i have come to a small issue and need ideas please…
How do i attach a lid without drilling or screwing, is there a way, is it possible? i have another
bowl that i will use for the lid but at the minute i am struggling for ideas on attaching it
I still have to drill the sensor hole and with hindsight, im thinking i prob should have done that pre foam
and i forgot to buy the pipe for that too. So, at present i am waiting for it to set and ideas for the lid ![]()
Fan is at the top - right? Could you use the holes in the top flange of the fan? I’m thinking lengths of all thread (studding IIRC) sticking up from the fan with spacers to set the height of the lid.
It’s looking good ,
Getting there, thanks Mick
Niko, fan is at the top and clips into place on to the inner pipe but I may have to rethink this idea
If i cannot get a decent enough lid to stay put, working on something, not even an idea, more of
a hope and pray, so will get back to you later :lol:
Hi Mick, Mine is mostly curd now but on removal of the inner core, i have found there there are/were air pockets
and may be a cause of concern with regards to insulation…
I think they are caused because its a aerosol it started off solid and then went all gaseous on me, thats how it looks
hindsight again, perhaps a little at a time over the space of a year lol bloody stuff… I was hoping you was going to
tell me you used a fantastic liquid form of insulation…
I would say about 70% is filled, so its now its going to be a case of making a channel and getting the last bit out the can
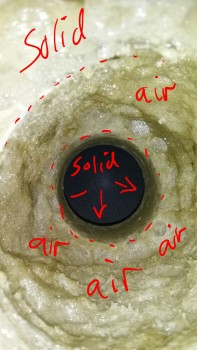
I would be surprised if yours is fully filled, then again, you do things the right way #-o :lol:
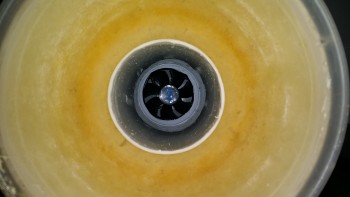
A wee update, more foam added, prob about 90% filled now, best its gonna get…
As for the lid, i decided to use another bowl, part filled with foam to insulate, although,
thats not really needed i dont think seen as heat rises and what with the fan sucking it
out too, but hey ho, least it gave me an idea as to attached the lid, screwed in 4 of the
biggest screws i have and then unscrewed and squirted silicone in there and then put the
screws back in, and then dobbed the tops with a bit of silicone, so it gives a little purchase
when slotted in the the holes in the base… theres a black dot on the base and lid, thats
for the lid alignment so i know which screw goes in where :lol:
I need to remove the decals off the bowl or gloss over, not sure yet…
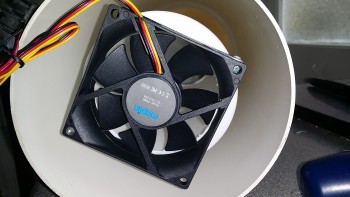
I have tested the fan using 12v and the suction through the shield is amazing, the PSU is a
switchable 12v/6v and i tried it on 6v and its still drawing some air through, prob enough
but only through testing will i find out…
Whilst i had the unit outside drying in the sun i can tell the foam was doing a decent job of
insulation as it was cool inside the unit, thats a fair result right there, top idea Mick, thanks ![]()
im not looking forward to the drilling of the hold for the sensor tube, that could be where things
go (.)(.) up :roll: :oops: I do have a tube of thick foam(packaging stuff) prob about 2inch
thick, i think i will use that opposed to inserting a tube, least that way i can manipulate the sensor
cable along the inside of the foam and the sensor its self wont be loose either, will see…
hers a few more pics, its very crude but once completed and setup, im hoping it will look ok ![]()


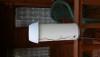
Finished project
Tested it in full sun against the main outside temp/hum thats in the shade of the house and it was on par and
like i said, this was in direct sunlight and the other sensor was in the shade, no sun whatsoever, you can also
see from the graph then when the sun goes in this reading under compared to the main sensor…
Wondering if it will need a solar switch to give power when the sun is out and cut it when cloudy? will see how it
goes for a few days in real life trials, just need to figure out a mounting system for it, it weighs 1.5kg 8O

hi
in the chart which colour is the sensor. Full sun
so saying when there’s no sun on the sensor there is a temperature drop?
try reducing the fan speed, as you only need enough air to pass over sensors not forced air
the fan I’ve used is 12v I’m running it on 4.5 volts drawing air from the bottom out to the top
I was using a sponge type filter as a bug screen but noticed it was not very good with humility, so I changed the filter to a fine nylon mesh
this has solved the problem with the differential in humidity
for the brackets you could use a plastic clip the ones you can use for securing the ducting pipe to the wall
attach a plate across the front where the old drilled and connect a bracket from this
will take a photo of the one I made
Hi Mick, the blue is the new shield, you can see its more responsive to, where as the temp sensor in the shade was slower to respond when the sun came out, you can gauge that but the solar line on the same graph…
Not using any insect screen yet, will see how things go, still need to mount it yet…
I can lower the v down to 6 as it’s only a 12 or 6v psu, once I figure out the mount to part I can then see what’s what.
On an up side, I have made a temp probe today, the probe just needs sealing now, prob a smidging of hot glue might do that.
I will use the main outside temp/hum sensor for use on the shield, just hoping my hole is big enough for it, not tried yet, but nothing is sealed so it will be easy enough to to modify if needs be…
I’m going to try to use a speed controller which is linked to a temperature sensor have a look at the chart
http://www.ebay.co.uk/itm/DC-12V-Smart-Fan-Speed-Controller-Automatic-Temperature-Sensor-Control-/131575183683?hash=item1ea27df943:g:ewIAAOSwv0tU9xSP
the screen net is normally used on Windows to keep out flies.
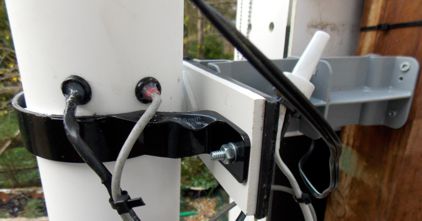
Bracket see image
The speed controller looks good, not seeing the adjuster pot, unless it’s not shown in the image. I may go the other route and look for a sun/light sensor if there is such a thing, I’m sure there is, something like what a car auto dip rear view mirror uses in a car?
Bracket looks good, gonna have to visit wickes I think…
Will prob need a screen for the fan area too, prob more so for spiders?
you can get a module which has a light emitting diode and as a small pot which you can set the sensitivity it will engage a small relay
you can get them on eBay really cheap
there are quite a few different types but something like this should do
http://www.ebay.co.uk/itm/12V-Photoswitch-Photoresistance-LDR-Photoresistor-Relay-Module-Light-Detect-1-/331806017126?hash=item4d412e0666:g:muMAAOSws4JW69MB
Thanks Mick, just had a wee look and will go for that, gonna take a while to come mind,
Heres why i am at…
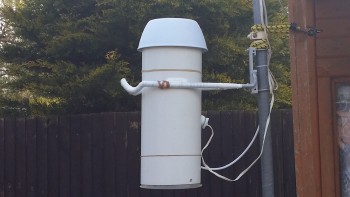
Today i purchase a large garage cycle holder, the idea was to bend it enough so that it will grip the tube.
Initial testing prove fruitful, it gripped it well, sadly the foam on it was black so i have (for now) wrapped
it in plumbing tape and also added (for now) a laggy band to both arms, this should provide any needed
grip. I have also, as a precautionary measure, added two slithers of silicon on the sides of the tube to
prevent any slippage, i have done this because i dont know if it will slip when wet, again, for now, this is
all temporary, expensive temp mind as the bike bracket was
Hi Mick, just noticed, their sensor opening is sloping downwards, wonder why that is?
I have done mine sloping upwards, purely for the rain, less chance of it dripping in from the sensor
i suppose theirs have a gasket or o-ring to prevent this…
Also noticed they have also placed the sensor in a “just the right place” not sure what difference that
could possibly make either, perhaps there is a reason but i just put mine sort of in the middle’ish
I also, for some unknown reason, thought theirs was a lot bigger lol (just been watching the video again)
I spose mine is a bit overkill at 150mm diameter, 3" internal tube, 1ft 7" tall and 1.5kg but if it works, it
dont matter i spose :lol:
I have a lot of foam in there thats for sure at 1.5" thick…
I am going to try and mount it in about an hour, where it will be mounted, there will be direct sunlight
from about midday, there will be some radiant heat from the post but im hoping it would be much of
an affect on it seen as its about a 1ft away from the post, only time will tell i spose…
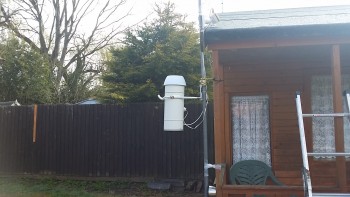
Here we go then, all done and mounted, all temporary mind, till I get sorted…
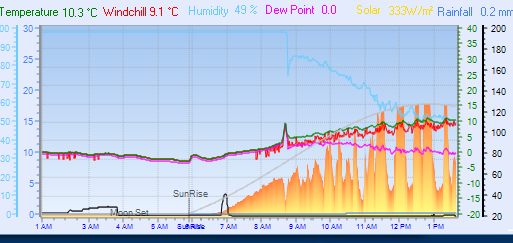
Hi Mick, here is the graph after a few hours, i would have expected more of a consistent line
opposed to the rocky mountains, you can see the peak earlier on when i was attaching it all.
so from then on it was live, this was running at 12v after 1pm is running on 6v, not much
difference if any?
You can see when the sun is in and out, its very responsive to the sun and cloud, im now going
to turn off the fan and see how that goes for a few hours…
Just added the weather underground charts for a comparison, the top one is the 14th when there
was some sun and the bottom is today, there is a stark difference in the readings, not so sure this
is for the best or not?
btw, the last peak on the bottom one is without the fan…
Any thoughts anyone?